
Farm Program
As promised here is the page that we have dedicated just for this program. We have big goals for this program and we want to document the process as we move to that goal.
The Present

First steps in prepping the land
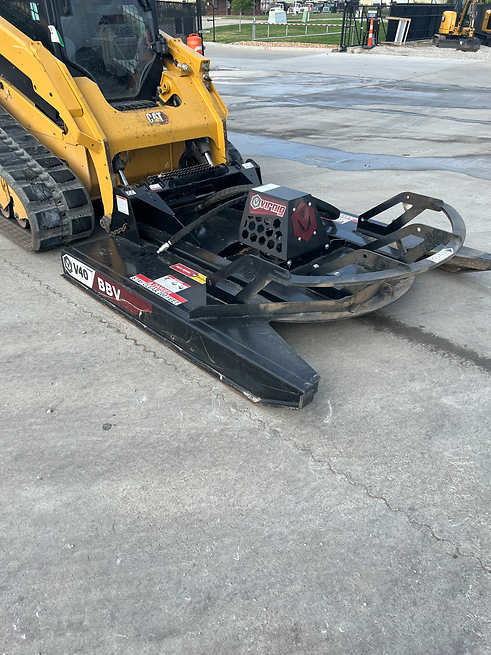
Brush Cutters
We learned a lot about the different styles and brands of brush cutters available. First, let's discuss the front of the brush cutter. The one we rented and have pictured is the best option we found in the Kansas City area. We tested 10 different models to determine which works best for the thick overgrowth on our property. When I say "the front," I'm referring to the front of the deck. Brush cutters come with either an open front (or face) or a closed front (or face), and each design has its advantages depending on the situation. For our needs, the open face works best. With an open face, you can drive into the brush and cut it down before reaching the deck area. In contrast, a closed face requires you to lift the brush cutter and set it down onto the thick brush. While a closed face can work for thinner brush or weeds up to 1 foot tall, it is not suitable for the heavy overgrowth we are dealing with. The second consideration is the drive motors that power the blades. Next is the deck size; I prefer a 60-inch deck because it doesn't strain the machine and fits into smaller spaces. This preference is subjective, so you can decide what works best for you. Lastly, consider the number of blades each deck has. The more affordable models typically have two blades. I say "affordable," but keep in mind that all of these brush cutters are thousands of dollars. One company that stands out is Rut Manufacturing, which seems to produce high-quality products at a good price. Although I haven't personally used their products, their website and YouTube videos showcase them well compared to others I've used. Once we have the funds, we plan to purchase one and will keep you informed. If you're in the market for a brush cutter for your skid steer, I recommend starting here. If you are looking to rent one, you can get the model shown on the right at Foley Rentals. They have several styles, so be sure to choose the one pictured above. The button below will take you to Rut Manufacturing's website for more information.
Mulchers
Mulchers can be difficult to find for rent in our area. The one we discovered was a CAT brand, which we rented from Foley Rental. There are two main styles of mulchers: the drum style, which is depicted to the right, and the disk style that resembles a brush cutter. We have only used the drum style, so that’s what we’ll focus on. The mulchers available for rent typically have carbide teeth. These teeth function like hammers, breaking trees apart. This technique is slower than the knife teeth style, which actually cuts the trees into pieces. The mulchers you often see on YouTube use knife teeth. The primary reason knife teeth are not available for rent is due to their maintenance requirements and durability issues. These knives need to be sharpened daily, or even twice a day, depending on usage. Rocks and dirt can quickly dull the blades, and replacing a set of knife teeth can cost thousands of dollars. In contrast, carbide teeth are almost indestructible and require no maintenance. These mulchers require a machine with a high-flow hydraulic system, and the larger the skid steer, the better the mulcher will perform. The cost of these mulchers typically runs around $50,000. RUT Manufacturing also produces mulchers, and their models range from $18,000 to $35,000, with options for a combination of carbide and knife teeth sets. However, we have not used a RUT mulcher since the only one available for rent in our area was the CAT brand from Foley Rental, which costs about $5,000 a month to rent—quite a significant expense. It’s also important to note that there is a learning curve involved in using a mulcher, so please keep this in mind when considering how long you will need one. If you are interested in purchasing a mulcher, the button below will take you to RUT's website.

Land Survey
Due to the amount of over growth on the property that we bought and the 2 properties that touch ours we had to do some clearing first. We spoke with both couples that own the other properties and informed them that we wanted to put up fencing and to do so we were going to have the land surveyed. The surveyor asked if we could clear out what we believed was the property line as his equipment wouldn't work in the over growth present. They agreed and then we started clearing the property lines. If you're not careful with this process it can become a nightmare. Please always communicate before doing anything with your property lines.
Then once we had the survey completed we started with the fence.
The Fence


The above pictures show us installing the fence that we are going with. The first picture is the Style that we picked out. The next is the raw materials that we purchased from an auction. We bought a post driver attachment for a skid steer. It's a Montana Fork Rail Mount T- REX 350 E and we bought it for about $1,500. We cut our post to 11' and drove them to a 5' exposed length. Cows and farm animals are going to be pushing against the fence so we wanted it to be strong. We ran a stringline the length of the property, corner to corner, and used it as our straight line. Using a post level we set the post plum. Once we had the post set we used a wire brush on a grinder to clean the post and then we painted them with Rust-Oleum Black Gloss. We used a 6" roller to paint them. We plan on installing Solar lights on the front section. The ones we picked out are from Menards and come in a 2 pack. They are 30 lumuns which is the brights solar powered light we could find. They cost about $20 a pack. The fence wire that we are planning on using is by Stay-Tuff. It's Fixed Knot Xtreme Black. The model # SZAB-830 and has a lifetime warranty. Only want to do this fence once! This one has a black coating to match the post.
Updates


 |  |  |  |
|---|---|---|---|
 |  |  |  |
 |
We have started with 12 chickens for egg production to get an idea of what our budget would look like for our goal of raising 240 chickens. Currently, each chicken is selling for as much as $20 in our area. To reach our goal of 240 chickens, we would need to raise $4,800 just for their purchase.
In addition to the initial cost of the chickens, the feed for our current 12 chickens costs us nearly $100 per month. Therefore, for 240 chickens, we would need approximately $2,000 per month for feed.
Currently, we have housing that can accommodate only 24 chickens, so we will need to build a larger coop. We have estimated that constructing a coop large enough to house all the chickens and protect them from the weather and predators will cost about $15,000.
We plan to let the chickens free-range from noon until dark, keeping them in the coop until noon to encourage them to lay their eggs before being let outside. To achieve our goal, we need to find a more affordable feed source, as we currently do not have the budget to support both feed costs and the construction of a new coop. We welcome any suggestions or opinions on how to proceed.


Our garden was full of ups and downs. We had issues with our corn this year. Usually, our corn does great. We also had issues with our watermelons and peach trees. The watermelons wouldn't rippen, they always grow great but we can't get them to rippen. We had three peach trees die this year. This garden that we planted have a long way to go to reach our goal. We have devided the land into sectiond. We have allowed for a orchard, vineyard, garden, and and greenhouse area.